
The question I get more than any other is “Are you a chef?” I then explain how I am just a guy who has always loved to eat, and that love, along with a personality driven to explore and create, led me to cooking. Well, not just cooking, but really digging into the origins of ingredients, techniques and flavors. It all works together.
I am an electrical engineer and engineering physicist by training. As a kid, when I wasn’t stuffing myself with food, I could usually be found reading a science book or conducting experiments in my basement laboratory. A lot of that was looking into things that burned. I loved fire, still do. I loved to be outside, too, observing nature and trying to understand how things work.
Through my career, not publishing this blog, but my actual paying jobs, I have been fortunate to travel the world. People in every place want to show you what the best things are, and that usually comes back to the best foods. After a day of work, I never wanted to just go back to my hotel. I wanted to explore, and my hosts or co-travelers, unless I was traveling alone, frequently offered to take us to their favorite spots.
I vividly recall one Italian colleague who was giving a very animated presentation during a group dinner outside of Naples about the best thing to eat in every part of Italy. He had traveled the country from end to end and back again. The wear and tear on his company car was visual proof. In each place, he said, there is at least one thing that the area is known for, and that is the thing you want in that place. He proclaimed he would write this all in a book to record these best things for posterity. The truth of his assertions about what is “the best thing in a place” stuck with me, and I often think about it when I am on the road.
The axiom at the root of my colleague’s exuberance, meets resistance from chain restaurants that try to drive “quality” to a common, usually deep fried or corn syrup soaked, denominator. Incurious people often want the thing they always have instead of seeking out that best local thing. I found this in Japan, when I was so excited to find a restaurant where everything was made with eel. It was my turn to pick the place for dinner, so eel it was. It was fantastic, to me. My colleagues that evening went for pizza after they watched me eat all things eel. I might add that their pizza looked like someone opened a can of Green Giant corn and dumped it over the top. No thanks. I think I made the better choice, and they missed out. While I’m sure there is decent pizza available in Japan, seek the local specialties.
Another common food debacle is how restaurants tout their mastery of dishes from another area. I have found that these sad attempts to replicate dishes that are wonderful at the source, will almost always fall flat. I can’t tell you how many times I have been tempted by servers telling me how their “Maryland crab cake” is world famous, everyone loves it, blah, blah, blah. I fell for that one before and was rewarded with a pile of bland, mushy canned crab and tasteless filler. Not a tasty backfin lump in sight. Many times I have seen my fellow diners fall for this trick. I do my civic duty and vigorously warn them off, but the server does the hard sell, and my advice goes unheeded until the inevitable “you were right”.
If you are going to tout a dish as being the same as the specialty of another place, do some homework!
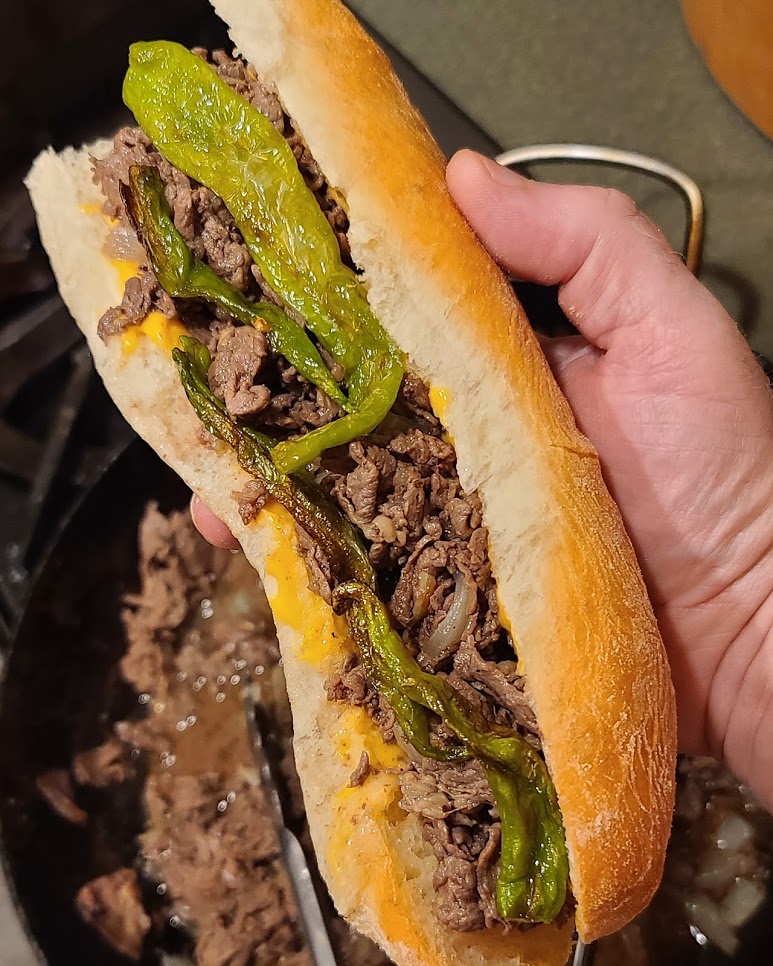
Which brings us to the subject of this post: the Philly Cheesesteak. I have seen this simple sandwich blasphemed all over the planet. The roll is wrong, the meat is all wrong, the cheese is wrong, it’s topped with all manner of inappropriate toppings and slathered with sauces that are an abomination, even the onions are wrong. Make no mistake, there is plenty of variation and disagreement on the sandwich even within the City of Brotherly Love, but there are certain aspects you do not mess with.
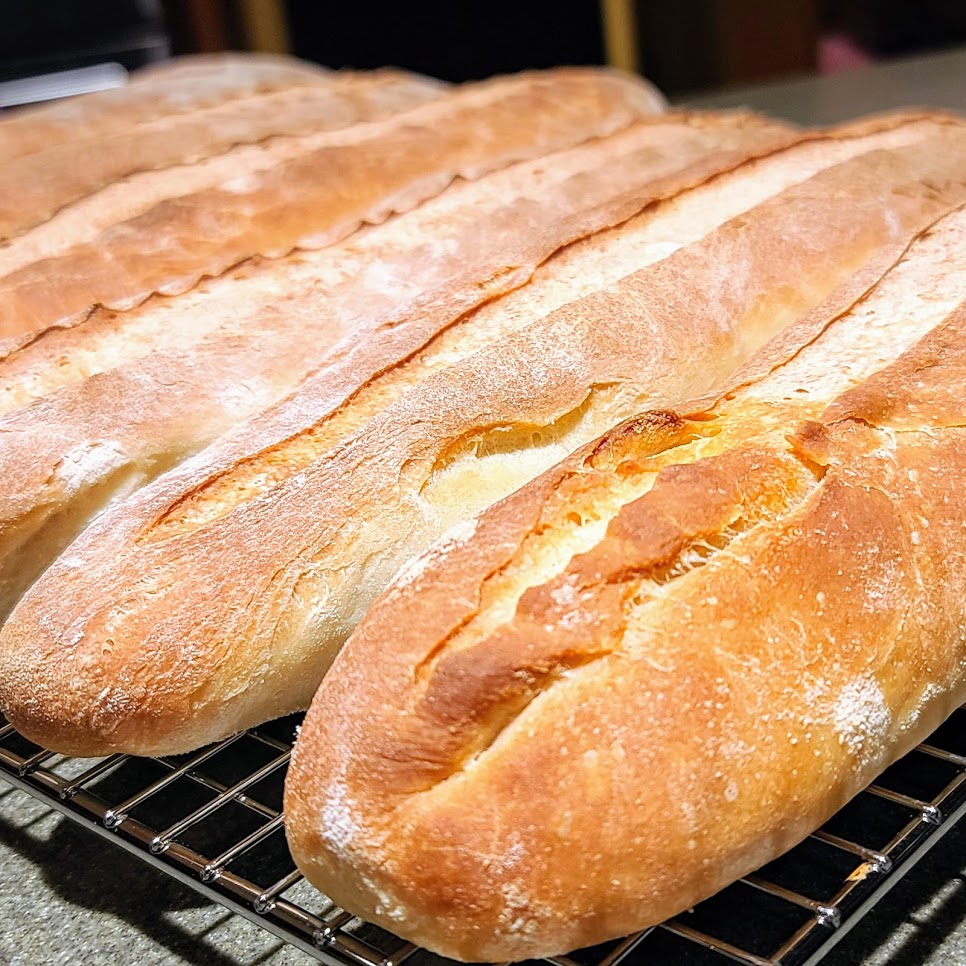
The Roll
The proper roll for a cheesesteak is an Italian steak roll. These rolls are made daily by many bakeries in southeast Pennsylvania (PA). This is a roll specifically made for cheesesteak. It is NOT a baguette; they are too crunchy. It is not a soft hoagie roll; they will disintegrate and turn to mush with the properly moist sandwich filling. It is a roll with a thin crust with just the right bite and enough to hold up to the moisture of the sandwich filling. The sandwich has to hold its structure. The crumb has small, even holes and a fluffy texture. The roll needs a bite. It is best eaten the day the rolls are made. Some folks like a roll with sesame seeds, either way is ok. I prefer unseeded.
You can buy Amoroso or Liscio’s steak rolls. Before I cracked the code on baking my own rolls, we would stock up on rolls on trips to PA. When we visit family in Lancaster, PA, we get our rolls the day they will be eaten from a local Italian bakery, Alfred and Sam’s.
To make homemade rolls takes at least 2 hours for them to have time to properly rise, so plan ahead. Here’s the recipe:
- 75g warm water
- 7g baking yeast (1 packet)
- 30g sugar
- 500g warm water
- 900g all purpose flour
- 16g salt
- 2T olive oil
- 1T semolina
Place the 75g warm water in a small bowl. Mix in the sugar to dissolve. Sprinkle the yeast over the top and set aside until it is foamy, about 5 minutes.
Meanwhile, combine the 500g warm water and the 900g flour. This will make a very heavy dough. Once the flour and water are combined, let it rest for about 10 minutes. The ensures the flour is fully hydrated and will aid in gluten development. Add in the softened yeast mixture and the salt. Knead or use a stand mixer with dough hook until the dough is smooth, stretches without tearing, is just barely sticky, and bubbles are visible in it. Coat the dough with some olive oil and place in a bowl to rise. The dough will double in size in about 45-60 minutes.
Turn the dough out of the bowl onto a countertop very lightly dusted with flour. Punch down the dough. Stretch and fold it several times and press out all the gas. Let the dough rest on the counter for 10 minutes.
After the rest, cut the dough into six pieces of 250g each or four pieces 375g each. Roll each piece into a ball. Flatten the ball with the palm of your hand to about 1/4″ thick. Roll the flattened dough up like a jellyroll. Then starting from the middle of the roll, using your fingers of both hands,roll the dough over the lightly floured surface. The dough should slightly stick to the surface, but not leave any dough behind. If it sticks too much, add more flour. If it does not stick at all, you have too much flour. As you roll each roll out to the end, use your palms to apply a little more pressure. A smooth rolling motion starting in the middle with fingers and then out to the ends with you palms will make the rolls uniform, but don’t worry if there is a little variation.

Use a 1/2 sheet pan for the rolls. Place a piece of parchment on the pan. Lightly spray (I use a Misto for this) the parchment with olive oil and then sprinkle with semolina flour. If you made 6 rolls, place them across the pan short-ways. If you made 4, then evenly place them on the pan the long way. If the rolls are too short, roll them more or give a little tug to lengthen them. If they are too long, then pull them together to shorten.
Allow the rolls to rise uncovered until they are almost touching and about 2 to 2-1/2″ in diameter. Before they touch, lightly coat the rolls with olive oil. Heat the oven to 400-420F with a small pan of water in the bottom to add steam. Right before the rolls go in the oven, slash them lengthwise with a razor blade. Bake for 20 minutes. I turn my pan 180 degrees at 10 minutes to make sure they brown evenly. When the time is up and the rolls are nicely browned, remove them from the oven, separate the rolls where they baked together (the olive oil helps this) and cool on wire rack until dinner time.
The Steak
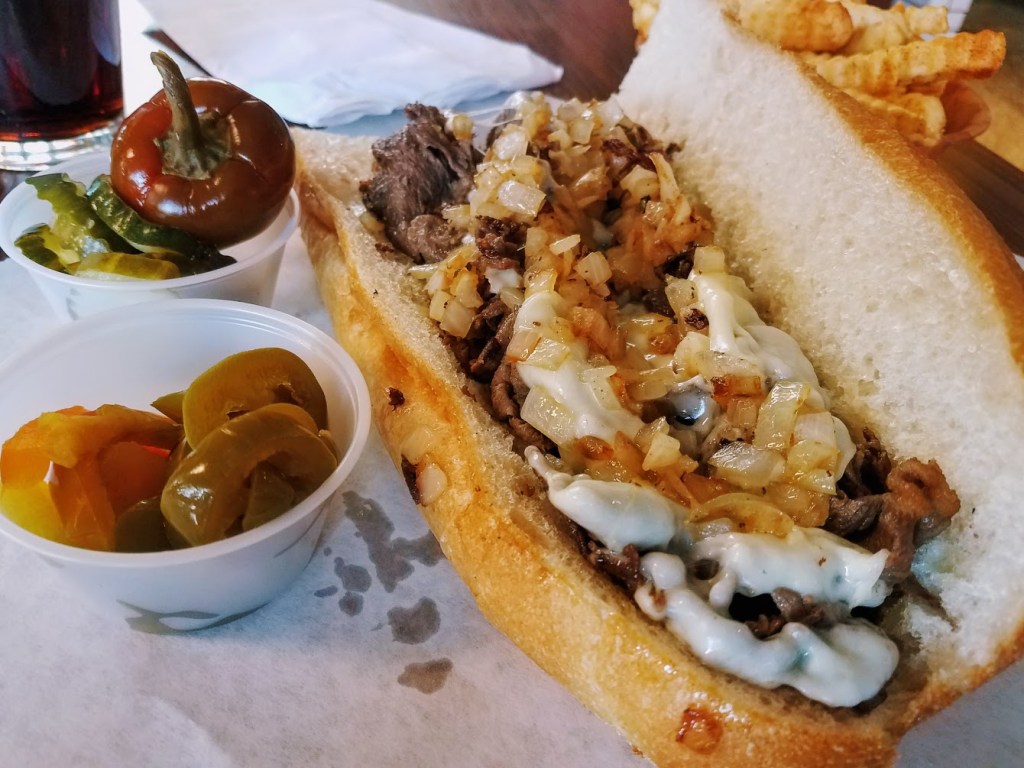
Next is the beef. Rib eye is the preferred meat for Philly cheesesteak. Sirloin can be used as well. Chipped and re-formed “Steak-Umms” and other similar products are used at low end places in Philly, but if you’re going to the trouble to make your own, use quality meat.
Our local grocery store, a Korean market, sells whole cryo-packed ribeye roll since it is commonly used for Korean bulgogi. It is high quality Angus beef. One roll is about 10 pounds, good for four meals for our family. I cut the roll in four pieces, bag them and freeze.
If you live near a Korean market, you can buy pre-sliced ribeye for bulgogi, and it’s perfect for cheesesteaks.
When I plan to make cheesesteaks, I take on piece of the ribeye out of the freezer a day in advance so it partially thaws. Then I use a meat slicer or sharp knife to slice it very thin. If it’s fully thawed, this gets messy, so make sure the meat is still icy, but not rock hard. I can tell when the meat is the right thickness when a slice can easily be pulled apart.

Next is how to cook it. Some folks swear by keeping the slices whole. I like mine cut in smaller pieces. I stack piles of the sliced ribeye on the cutting board and cut them in one inch strips.
Places that turn out loads of cheesesteaks will sear the meat on a griddle. For my 2.5 pound batch, I use a large carbon steel skillet. I heat the skillet on medium-high heat. I put a pat of butter in the pan so I can see how hot the pan is. The meat needs the pan to be hot when it goes in or it will just give up moisture and then be boiled meat. That is not good. You want a good sear on the meat.
Add the meat to the pan and let it sear. Turn the meat only when you see it start to get a little crisp on the edges. Keep turning until the seared edges are uniformly distributed. Only when it reaches this point should you add seasonings.
I season mine with salt, black pepper, about a teaspoon each of my homemade Worcestershire sauce and my homemade fermented hot sauce. Finally, 2-3 leaves of minced fresh or dried whole leaf sage. Purists, the ones who never cooked a decent cheesesteak themselves, but claim to be experts because of all they have eaten, will moan about this, but trust me, the seasonings are not apparent in the finished product but their absence would be noted by blandness. Finish cooking just until the last bit of pink leaves the meat and it is still moist and juicy.
The Onions
If you want onions, you order your cheesesteak “wit”. The proper onion is a large yellow Spanish onion. I dice one large onion for 2-1/2 lbs of meat. The onion is mostly cooked in a separate pan because cooking with the meat will, once again, yield a lot of liquid that would ruin the meat’s critical sear, and it would seep into the meat and cloud the beef flavor.
Heat another smaller skillet. I use another carbon steel skillet for this. Heat 2T butter until it stops sizzling. Use medium-high heat. Add the diced onions. Add a bit of salt. If there is liquid, increase the heat to cook it off. Cook the onions until they brown around the edges. Sometimes I feel like a splash of hot sauce in there, but suit yourself.
Since we all like onions here, I stir the onions into the meat just before assembling the sandwiches. If you have folks who don’t like onions, you might want to question your association with them. You can top each sandwich separately with onions, but to me, you want onions.
No green peppers. No mushrooms, folks. We like those things, but not here. Nope.
The Cheese
It’s not a cheesesteak without cheese. This is another thing folks don’t get. they get all bent out of shape about how crappy American cheese is, or *gasp* Cheez Whiz. This is the cheese that belongs on a cheesesteak. You can get fancy and use provolone, but provolone is usually used for the roast pork sandwich, and cheesesteaks get American or Whiz.
A newcomer on the Philly scene is Cooper Sharp. It’s a bit of a misnomer because Cooper Sharp is American cheese, it just has a bit more flavor. Cooper Sharp is commonly available at deli counters in grocery stores. I buy a big chunk of it, not sliced.
Then take this to another level. Let’ make homemade Cooper Sharp whiz. To 100g shredded Cooper Sharp add 100g whole milk. Melt in a small pan. Strain into a whipped cream siphon and charge while warm (make sure your siphon can take warm temperatures) with three NO3 cartridges, shaking it each time.
This will make 4-5 cups of cheese sauce. I dispense some onto the roll, and then more on top of the meat so every bite has bread, meat and cheese. If there’s cheese left in the siphon, I spray it out into a container and keep in the fridge. It’s the consistency of Whiz from the fridge, and is most excellent to dip pretzels.
If you don’t have a whipping siphon, you can just make the cheese sauce, or you can melt the cheese on the hot meat in the pan and then use tongs to fill your roll.
Acceptable Toppings
Two toppings are acceptable: long hots and hoagie spread. This may be borderline sacrilege for some, but I like some heat. make these in advance and keep in the fridge.
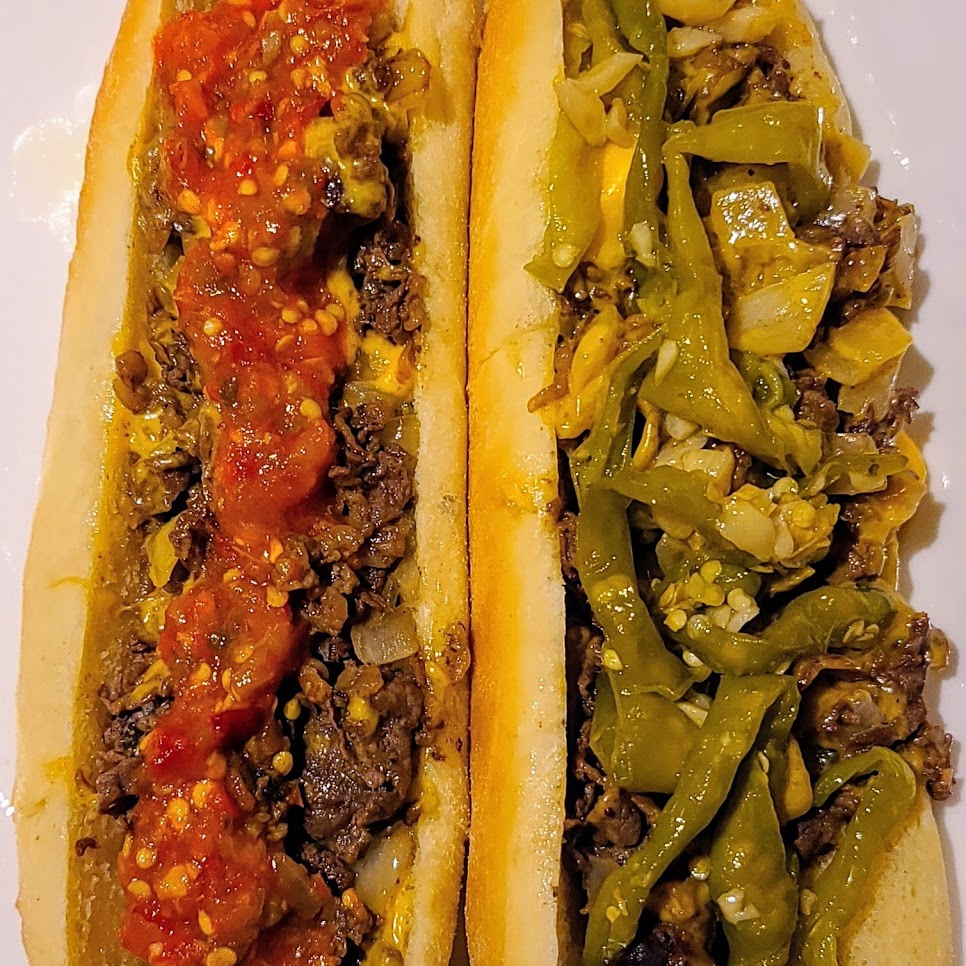
Long Hots
Long hots are long green peppers. I grow peppers just for this purpose, a type of cayenne. You need about a gallon of peppers to make a quart. It seems like a lot, but you will wish you had more.
Cut the stem off each pepper, and then cut the pepper in half lengthwise. Leave the seeds. Chop at least 1/2 cup garlic.
Heat about 1/2 cup of olive oil in a Dutch oven. Add the peppers and garlic. Add 1/2 cup water and heat to boil. Reduce the heat and keep the lid on until the peppers are completely soft. This takes a while. Then remove the lid and let the water cook off. Keep cooking until the peppers sizzle and just begin to brown. Stir in a little salt and some fresh herbs. Cool and place in a container to refrigerate.
They will keep for a month in the fridge, but usually they are gone long before that.
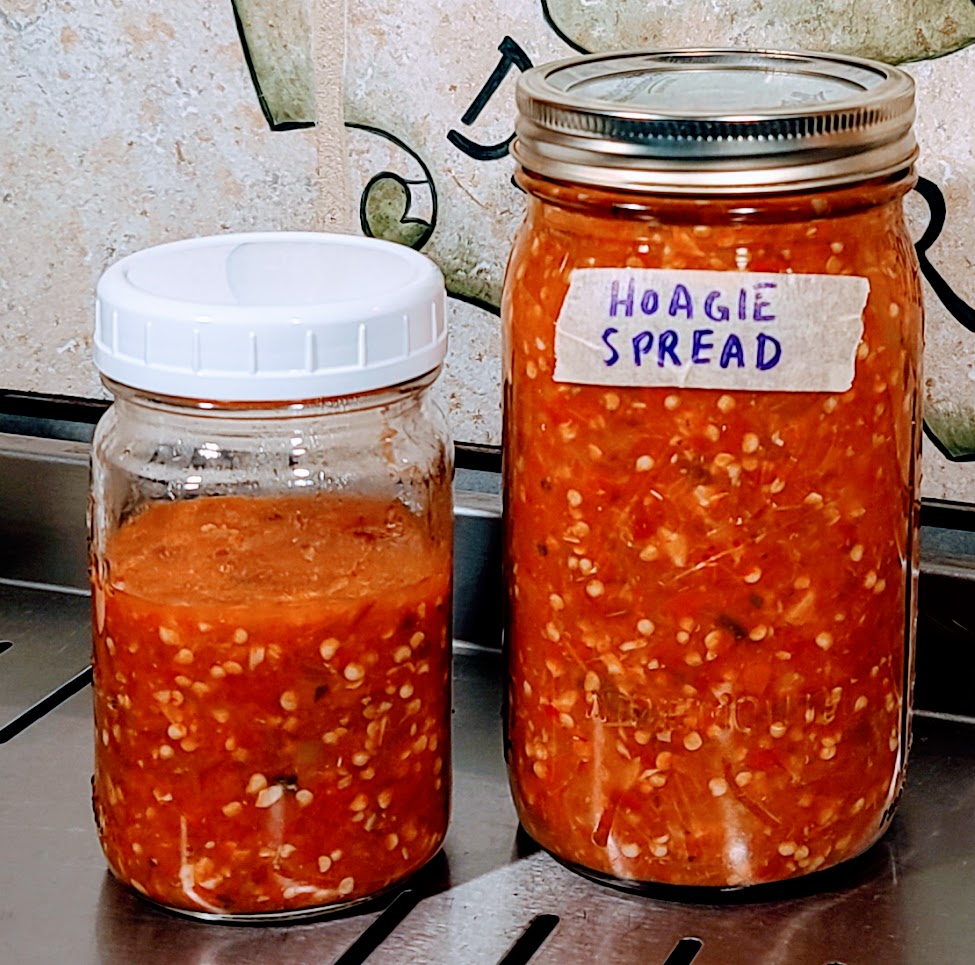
Hoagie Spread
Hoagie spread is commonplace in Philly. Simple to make, too. I finely chop a load of red peppers using mostly serranos, jalapenos, and other meaty hot red peppers. You can add super hot peppers if you like. Finely chop sweet onion, such as Vidalia, and garlic. Add fresh or dried oregano. Place in a saucepan and add apple cider vinegar to just below the level of the chopped peppers, onions, and garlic. Add one teaspoon of salt for each quart of vegetable matter. Cook until it’s soft. Cool and place in a jar to go in the fridge. This lasts for months in the fridge.
Assembling the Cheesesteak
A properly made cheesesteak will hold together while you eat it. The roll must have structural integrity. The contents of the sandwich need to be moist to the point that some juice or cheese may leak out from the end that you are not biting into, but never so much that the roll is soggy or falls apart.
Before you slice the roll, look at it to see which side of the roll with make the best “hinge”. That would be the sturdiest side of the roll. Slice the roll lengthwise, but cut only just over halfway through. Gently pull the roll apart leaving the crucial hinge. Never toast the roll, the bread must be fresh and have the right texture, and it will not need toasting.
Give each side of the roll a coating of melted cheese. It is a flaw to have un-melted cheese. I use my whipping siphon to lay down a nice coating of cheese on the roll. Work to keep the exterior crust of the roll clean and dry.
Next fill the roll with meat. Stuff it with meat until some tries to fall out. It is a failure to have insufficient meat. If you have your onions separate, add them now. Top the meat with more melted cheese, or melt cheese onto the meat before you add it to the roll.
Lastly, is the optional long hots or hoagie spread.
That’s it. Dig in!

What do you think about smoked gouda for cheese on the Philly?
LikeLike
It’s not traditional, but I have no problem with it. Gouda melts nicely.
LikeLiked by 1 person