“Joys come from simple and natural things; mist over meadows, sunlight on leaves, the path of the moon over water. Even rain and wind and stormy clouds bring joy.”
― Sigurd F. Olson

There is nothing like a trek into the wilderness to clear the mind and cleanse the soul, and one of my favorite wilderness areas is the canoe country of the area west of Lake Superior in northern Minnesota and Ontario. The area rewards those who face its rugged portages, paddling with the wind in your face, vicious storms, and bugs with stunning scenery, wildlife, tranquil silence, the starriest skies you ever saw, and world class fishing.
I’ve always held a deep love for outdoor adventure, and was lucky enough to have a very dear friend who introduced me to the treasure of these Boundary Waters over 30 years ago. Since then, I have made 11 trips, each one a cherished relief from the pressures of daily life; each day in the wild brings unexpected challenges and rewards.
Given my food obsession, the challenges and rewards extend to provisioning our meals for the voyage. There are several schools of thought on meal planning for an extended canoe trek. At one end of the spectrum is outfitting with a bunch of lightweight, pre-packaged freeze-dried meals. While some of these are extremely light weight and pretty tasty, and they are super easy to make (just pour in some boiling water and wait), I find these meals to be uninspired and monotonous after more than a day. Can’t do it.
The other extreme is to pack in fresh food. This requires an insulated food pack and ice packs. Folks pack in fresh meats, eggs, milk, fruit, vegetables, etc. Traveling like this is heavy work on portages, the places where all packs and canoes must be carried from one lake to the next. Portages in this region range from being pretty short, a few yards, to the 2-mile so-called “Death March Portage.” Carrying a load of fresh food and ice pretty much requires that there will be multiple trips across each portage.
Now portaging is all part of the fun of these trips, and I love a nice walk in the woods as much as anyone, even with a pack and a canoe on my back and even with knee-deep mud, bugs buzzing my ears, steep climbs and descents, and hopping from boulder to boulder. Still, my preference is to get across a portage in one trip.

This all leads to a very happy compromise where I can use my skills and imagination to plan a delightful, flavor-packed, and varied menu that is still light enough to carry in a single load. We do bring some fresh foods, like apples, garlic, or carrots, but most of the food is shelf stable dried, instant, or cured items. This year’s week-long trek by my wife, son and I included a food pack weighing in at a very manageable 35 pounds. The provisions have enough food for an extra day, just in case. I can easily manage this load while still carrying a 44 pound 3-person Kevlar canoe. Of course, each day of the trip lightens the food pack by an average of five pounds, but I did take on more load from the others to share the benefits of the reduced payload.
Before we get into the actual food, let’s look at the kitchen equipment needed. We need a balance of light weight and function. The most important item is the stove. I have a Coleman Apex II stove that can burn a variety of liquid fuels. I use white gas. This stove is no longer available, but MSR makes similar models. The stove is light, stable, reliable, and efficient. Bring enough gas for your trip; a week usually takes about 2 liters to be sure. I have a nesting cook kit with 3 and 2-quart pots and lids. Two pots com in handy for cleanup water. One pot for soap, and one for rinse. One lid is deep and can be used as a skillet or eating dish. I use it for breading fish, too. This cook kit holds collapsible eating bowl and sporks; each person needs a bowl and a spork. I also have a plastic mug for each person. The mugs nest together and support my portable pour over coffee set up. For cooking utensils, I bring a silicone spatula with a wood handle (the spatula comes off the handle for use as a pot scraper), a small wood spoon, a small whisk, a fillet knife, and another very small spatula to use as a spreader for peanut butter, etc. The silicone spatula gets used the most. Another item that is great, but no longer available is the Outback Oven. The main pan is a 10″ non-stick skillet, but it comes with accessories to turn the whole thing into a very good oven. I have made brownies, bread, pizzas, and even souffle in there. If you see one of these for sale somewhere, buy it! The whole thing nests together in a mesh bag. I bring a small coffee pot for heating water, and this is the one pot that I will stick in a campfire letting it get all black. I run it in the dishwasher when I get home, and it comes out like new. A folding fire grate is nice because you can use it as a stable surface over your stove, over a fire, or as a drying rack for clean dishes. I bring a small bottle of dish soap and a plastic scrubbie for the dishes. Remember to follow the principles of Leave No Trace!


For the food, my meal planning starts weeks in advance of the trip. Because of the physical exertion of paddling and portaging I plan on each person consuming double to triple their normal number of daily calories. I recall past trips and meals that were especially good; those are keepers. I start gathering items which I think I can work into meals. This usually involves one of my favorite pastimes, perusing the aisles of local ethnic markets. I look for beans, powdered whole and buttermilk, rusks (thick slabs of dried bread), noodles, instant sauces and seasonings, etc. I remove all extraneous packaging and make note of how much and why type of liquid or other ingredients are called for.
I stock a stuff sack of condiments and other “stuff.” This includes a spice kit, various film canisters loaded with salt, pepper, spice blends, and seeds for coating fish fillets; small Nalgene bottles of peanut oil, olive oil, and perhaps a citrus or vinaigrette for marinating fish; breading for fish; refillable tubes of ghee, hot sauce, and tomato paste; peanut butter and hazel nut spread; various candies and cookies; and a large flask of barrel proof bourbon — for medicinal purposes, of course.
I start putting my food dehydrator and vacuum sealer to work. I have a really nice dehydrator from The Sausage Maker and an Ary Vacmaster vacuum sealer. These units get a year-round workout here, but are especially useful in packing camp meals.
Pre-cooking and then drying beams makes them much easier to re-hydrate in the wild. I dry carrots, onions, garlic, tomatoes, peppers, peas, herbs, salsa, and pizza sauce. The dehydrator and vacuum sealer are also great for making jerky.
Lunches usually consist of jerky and other energy boosting items like dried fruit, granola bars, or cheese. I’ve become a fan of the items from Honey Stinger unless we make some similar homemade items. When we trek in cooler early Springtime weather, I include packages of instant noodles in our lunches. We can find a nice rock to pull over, quickly heat some water and enjoy a warming lunch. During warm weather, lunches typically do not require any cooking. I will remove the day’s lunch pouch from the food pack and place it in one of our under seat bags for quick access.
Jerky is a staple at our house, and I can make some very tasty jerky. I made beef and pork jerky so have some variety. Both use the same basic technique of marinating/curing the sliced meats, drying in the dehydrator, and then sealing and Pasteurizing for 2 hours at 140F in a sous vide water bath. (Recipes below.) Five pieces of jerky per person is a decent portion of meat for lunch along with the other items.

Pork Loin Jerky
Butterfly the loin to produce manageable pieces of jerky. Slice pork loin 1/4″ thick. Weigh the meat.
In a bowl, weigh out the following in percent of the total meat weight (e.g., 1000g of meat means 1% is 10g)
2% salt,
0.8% sugar,
0.25% cure #1,
0.5% granulated garlic,
0.3% Korean pepper flakes,
0.1% MSG, (don’t be scared, it’s harmless and adds flavor!)
0.8% Sodium Erythorbate (speeds curing time and aids in retaining moisture)
Mix thoroughly with the meat and refrigerate overnight. Place on racks for dehydrator and dehydrate for 6 hours at 138F. Vacuum seal portions in bags. Pasteurize in sous vide at 140F for 2 hours.
Beef Jerky
Use a lean cut such as top round or flank steak. Cut in 1/4″ strips. Weigh the meat.
In a bowl, weigh out the following in percent of the total meat weight (e.g., 1000g of meat means 1% is 10g)
1.8% salt,
0.9% sugar,
0.5% no-salt Montreal steak spice ground fine,
0.25% cure #1,
0.1% MSG.
Mix thoroughly with the meat and refrigerate overnight. Place on racks for dehydrator and dehydrate for 6 hours at 138F. Vacuum seal portions in bags. Pasteurize in sous vide at 140F for 2 hours.
Next up are the breakfasts. I pack a few no-cook breakfasts for the mornings where we need to break camp and get moving in a hurry. These are normally some type of granola, dried fruit and a bit of cured meat. On these mornings, we still heat water because I don’t know about you, but my morning has to include a robust jolt of coffee. After my days of dealing with cowboy coffee, I used to carry a Lexan French press for camp coffee, but lately I have been using a very nice lightweight pour over device that clamps onto my camp mug.
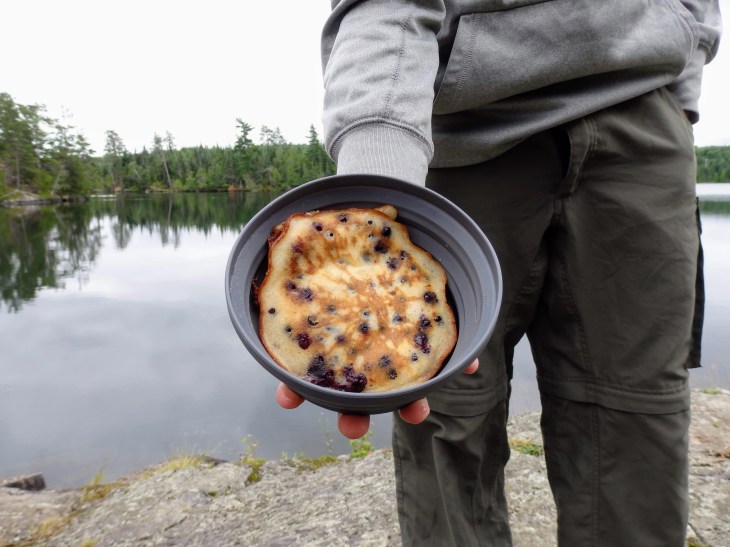
Since we’re heating water anyway, a fast cooked breakfast is instant oatmeal. It’s not my favorite, but it is good enough and filling. Cooked breakfasts include hashes made with dried potato slices (I buy the boxed scalloped potatoes and discard the sauce packet), cured meats, dried onions, and powdered eggs or fried rice with various dried vegetables and meats, and powdered eggs. You can make a very nice pancake mix with flour, baking powder, baking soda, salt, powdered eggs, and powdered buttermilk. Cook these in a bit of that ghee, and perhaps even add a load of fresh berries foraged along the way, and you will be quite satisfied!

One breakfast I like on the trail is powdered eggs. A lot of folks scoff at powdered eggs, but they can be made quite well with the right treatment. I start in the packing step by placing the eggs in a vacuum bag that is left unsealed. The whole meal will be sealed in a pouch, so I just put the eggs in a smaller bag with enough room to add water in camp. When ready to cook, start by adding some cool water to the eggs, squish the bag to break up any lumps and then just let it sit while you prep the rest. I put some freeze dried sausage in another bag (or use the main pouch), and add enough of my boiling coffee water to just allow each piece to get a bit of water. You can add any other dried or foraged items to this, too. Set this aside and let the sausage rehydrate. If you haven’t caught on yet, ghee, clarified butter, is a secret in my camp cooking. Get a little ghee heated in a skillet and add the sausage. Cook until if starts to brown, then add the eggs. Soaking the eggs ahead of time dissolves any remaining lumps and produces a better texture in the finished product. Also, folding over the top of the bag and carefully shaking it to get air in solution really helps make them more fluffy. I use a silicone spatula to scramble the egg and sausage mixture, making sure it is cooked through and evenly browned. Top with some melty cheese and serve.
If you’re more adventurous, you can even make a decent skillet gougeres with powdered eggs, flour, cheese, and butter or ghee. Souffle, too. Top it with foraged asparagus or fiddleheads, a bit of diced ham, and some packaged hollandaise sauce. Knorr hollandaise tastes pretty good on the trail.
Another very fine breakfast is dried beef on toast. Put a tablespoon of ghee in a skillet and melt. Toss in some shredded dried beef (or like I do, use some home cured bresaola) and cook until it frizzles. Add a splash of hot sauce, garlic powder, and some black pepper. Dried or foraged (be sure you know what you’re eating) mushrooms are also very good in this. Add 2T flour and toss around until the flour coats everything and gets a little brown, then add 2 cups of milk made with dried whole milk powder. Stir until the gravy thickens. Crush up some rusks in your bowl and top with the gravy.
What’s for dinner? Dinner is made when camp is all set up, ropes are up for hoisting the food pack out of reach of any inquisitive wildlife, plenty of water has been filtered for potability, and perhaps even a small fire is warming us and keeping bugs at bay. Dinner needs to be filling to replenish us from a hard day, and it must also be delicious. I also try to limit the amount of fuel and cookware needed for making the meal. We need to conserve our fuel and keep the cleanup as easy as possible.
Many great meals can be made in a single pot or skillet. It’s not mandatory to use one pot, but I would call it desirable for a number of reasons: one active burner, one pot to attend to, and just one pot to clean. In the weeks approaching a wilderness trip my mind races with dinner ideas. When I’m at the store, I find myself buying things that might, just might, work into a meal plan. Yes, I am a hoarder of ingredients.
In the past, there were limited proteins available for the kind of meals I like to make. Shelf stable cured meats are a natural, but be careful not to overdo it with one or two items. (I’m still being reminded of what is known as the “salty meat” trip where I managed to work Virginia country ham into several meals.) Lean ground meats can be cooked on their own or in a dish, chili for example, and then dried quite well. I have done this with ground beef, turkey, and homemade low fat sausage. These days, due to an impending invasion of zombies, all sorts of freeze dried items are easily available.
I convert meals I cook all the time into wilderness fare. This limits or even eliminates the amount of testing that needs to be done in advance. I know the meals will work with adjustments to the ingredients and techniques. All of these recipes are sized to feed 3-4 people, using a 3 quart pot or 10″ skillet.
Beef and Bean Burritos
Large flour tortillas (2-3 per person)
2 cans refried beans, dehydrated (spread out beans on parchment paper and place in dehydrator until completely dry)
1-1/2 cups freeze dried ground beef
2T taco seasoning
1 small can green chilies, dehydrated (optional)
1 cup salsa, dehydrated (pour 1 cup salsa (I used homemade salsa) on parchment paper and place in dehydrator until completely dry)
8 oz melting cheese
I put everything but the tortillas and cheese in the main vacuum pouch, then put the wrapped cheese and tortillas in the pouch and seal. In camp, bring 6 cups of water to a boil. Mix in the dry items and simmer until it is thick and the meat is rehydrated. Add more water if needed. When ready to serve, top the pot with the cheese, and scoop into each person’s first tortilla. If you’re careful, you won’t even get a dish dirty!
This meal is one of the heaviest ones I will pack, so we like to have this on the first night out. You can make this heartier by adding rice, but we find it’s already pretty filling.
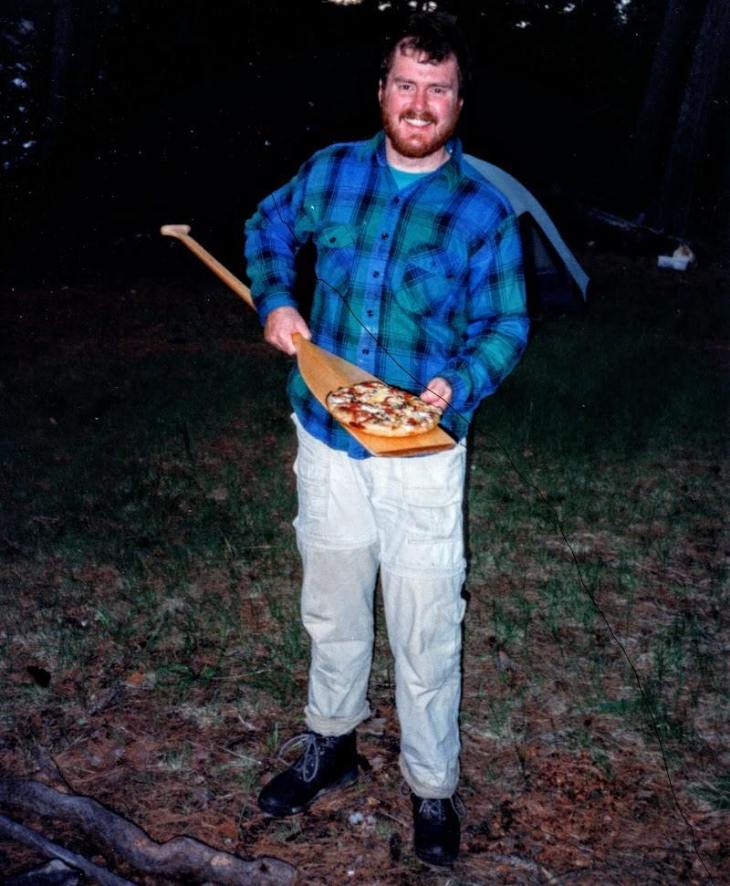
Pizza
This one requires some means to bake. I have the aforementioned Outback Oven, and it does a great job of making backcountry pizza.
Decide if you’re up to making dough in the wild. If so, then pack 100g flour and a pinch of dry yeast for each pizza. I put the flour and yeast together in the meal bag. In camp, add 60 ml water to the flour/yeast for each pizza. Mix in a pot with a spoon, then knead with an oiled hand (remember the small Nalgene of olive oil?). Knead in a pinch of salt per pizza. Cover and set aside.
Flour/yeast for crusts -or bring premade 10″ crusts
1/4 cup tomato sauce, dehydrated (I crush a pint of drained, whole, home-canned San Marzano tomatoes, add some black pepper and minced fresh basil. Pour onto a piece of parchment and dehydrate until leathery.
4 oz low moisture mozzarella per pizza
small bag of grated Parmigiano-Reggiano
toppings (pepperoni holds up well)
Pack the dehydrated pizza sauce in a heatproof bag (I use the bags that I get from Vacmaster for my vacuum sealer. They are cheap and hold up to heat.) In camp, add boiling water to the sauce to rehydrate it. Fold the top down and set aside. When it’s re-hydrated, you may want to squeeze a little tomato paste into it from your provisions kit.
If making pizza from fresh dough, I use a flat canoe paddle as a peel. You can also use a dish or a flat rock to stretch out the dough. Preheat the Outback Oven, or your baking device. Oil the pan and place the dough in it. Stretch out to fill the pan.
If using premade crust, then place the crust in the preheated, oiled pan of the baking device.
Top the pizza with sauce, cheese, and sausage (I brought some tasty home cured sopressata on our last trip) or other toppings. If you manage to forage mushrooms, this is a good use for a few specimens.
Heat the oven to the baking range and then hold for 10-12 minutes. Repeat.
This is also one of the heavier meals to carry, and it uses a bit of fuel, but it is very tasty!
Ziti and Sausage in Tomato Sauce
1 pound box ziti pasta
1 quart tomatoes, dehydrated (I used a quart of homegrown, home canned San Marzano tomatoes)
dried porcini mushrooms (optional)
dried red peppers (optional)
1 package instant spaghetti sauce seasoning
1-1/2 cups freeze dried sausage
small bag of grated Parmigiano-Reggiano
In camp, bring 2-1/2 quarts of water to a boil. Add salt from provisions. Add pasta and reduce heat to low boil for 5 minutes. Add tomatoes, mushrooms, peppers, seasoning mix, and sausage. Simmer until the sausage is fully hydrated. Add more water if needed. Add olive oil, black pepper, and tomato paste from provisions. Top with cheese, serve.

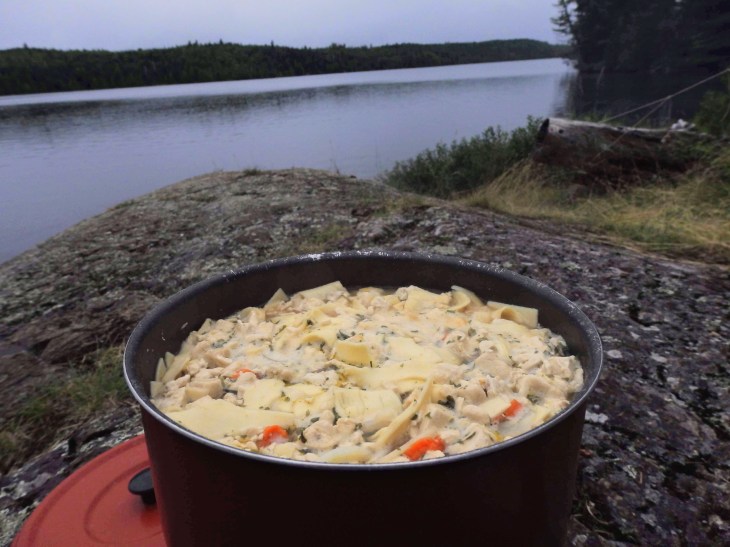
Pennsylvania Dutch Chicken Pot Pie
1 envelope turkey gravy mix
1 chicken bullion cube (low-salt)
1 box dried, sliced potatoes (buy a box of instant scalloped potatoes and discard the sauce package)
3 carrots, peeled, sliced and dehydrated
1 onion, peeled, julienne and dehydrated
1T dried parsley
1-1/2 cup freeze dried cubed chicken
1 9 oz. box oven ready egg lasagna pasta
In camp, bring 2-1/2 quarts of water to a boil. Add the first 7 ingredients (all but the pasta). Simmer until the chicken and vegetables are hydrated and the broth thickens. Bring back to a low boil. Break the pasta into 1-2 inch pieces and drop into the broth. Cook until the pasta is done. Serve.
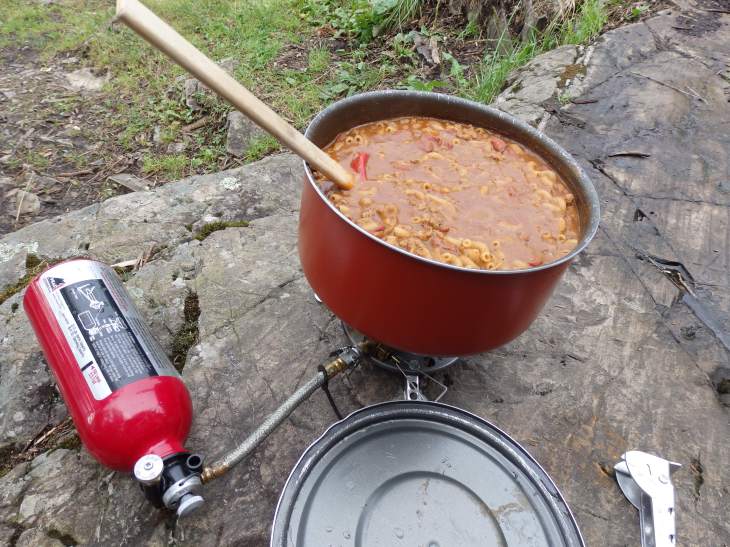
Chili Soup
1 envelope beef stock mix
1-1/2 cups freeze dried ground beef
2 cups elbow macaroni
1 pint tomatoes, dehydrated (I used a pint of homegrown, home canned San Marzano tomatoes)
1 can kidney beans, dried (drying cooked beans makes them cook much faster)
1 onion, peeled, julienne and dehydrated
dried green chilies (as many as you like)
3T chili powder plus 2t granulated garlic
2T tomato paste from provisions
1t dried vinegar (you can make this, but it’s much simpler to buy it)
In camp, bring 2-1/2 quarts of water to a boil. Add all ingredients. Reduce heat to simmer and cook until everything is hydrated. Add water as needed. Season with salt and pepper if needed. Pretty simple, but very tasty with a sunset and a lake.
This is how we eat in the wilderness, striking a balance between carrying a heavy load or opting for expansive and bland packaged meals. These are just a few examples to give some ideas of how to concoct the dishes you like. Remember to remove all extra packaging, to simplify the preparation process, and to pack in lots of flavor.
I usually pack in one or two extra meals, just in case. You may also be lucky enough to get some fish along the way or find other foraged items to augment your meals. And don’t forget to save room for dessert.


Looks like you guys have a great time
Love pictures of the food and scenery
Thanks for the share
Dave
LikeLiked by 1 person
Thanks Dave!
LikeLike
Hi Tim. Just returned from 2 weeks of camping in Glacier NP. I used some of your meal ideas to feed 4 of us and the guys said they have never eaten so well. I especially like the idea of using the dehydrated potatoes from the scalloped potato box. Eggs and hash browns were a great start for a 12 mile hike to the glacier and back. I also used rice noodles instead of spaghetti to save fuel. These only need a few minutes in hot water. Now I need a dehydrator. Thanks again!
LikeLiked by 1 person