When I was a boy, pizza was a Sunday night ritual in our house. We started out with pizza kits that came in a box with “just add water” dough mix, a small can of cooked pizza sauce, and another containing powdered cheese. We moved on to buying frozen bread dough for the crusts, making our own sauce, using better cheese, and adding more toppings.
Pizza was also a common thread for kids’ parties when I was growing up. A gang of kids for a birthday, a Cub Scout meeting, whatever, each of us found a buddy and worked on making our own pizza. I have many memories of kids who never handled dough before, their hands now covered with sticky dough and not knowing how they were going to turn this into food. Somehow, everyone always got their fill. Much credit belongs to my mother’s great patience and love of food.
Pizza is good food, it is pretty easy to make, and it is not expensive. I made and ate a lot of pizza in my university days. It was so much better than the greasy, pricey pies from the local pizzerias.
I became pretty skilled at making my dough; no need to measure anything, I can do it all by look and feel. I started to grow and can my own San Marzano tomatoes and making fresh, bright pizza sauce. I discovered new and better cheeses and toppings. I started using a pizza stone in an electric oven heated as high as possible. The pizza was pretty darn good. I saw no reason to improve on it.
I traveled to Naples and ate pizza in some of the Meccas there. It was another level, but I accepted that they were professionals who had been doing this a very long time. Of course it was really good. I made a few adjustments at home, and was still very satisfied with the results.
Then, I had wood fired pizza from my friend Paul’s backyard forno. He made his own pizza oven from scratch. It was a revelation. The fire was so hot that the pizza cooked in a minute or two. It gets crisp on all surfaces while the interior of the crust remains fluffy and just chewy enough. It would be very cool to have a wood burning oven, but I was still OK with getting invited over once or twice a year to partake. Everyone kept asking me, “When are you going to get one?” My response was always the same, “It would be great, but I don’t see it happening. Too many other projects.”
Little did I know.
My friends Charlie and Jim were plotting. I was about to turn 50, and they were going to surprise me by having a load of friends contribute to buying me a pizza oven. I didn’t have a clue. In fact, while our family was on vacation in Rome, I looked up a wood fired pizza place for lunch near the Coliseum. Feasting on fresh pizza, I was going on about how great it would be to have our own oven. Only later did I learn they were all about to explode holding in the deep secret.

Shortly after we returned home, there were my friends presenting me with the biggest surprise I ever got. Wow, those are some friends!
We settled on a 110 cm model from Forno Bravo. We hired a skilled mason to build the foundation and finish the oven. Of course, I also had to get a well-used 20 quart Hobart mixer to crank out some big batches of dough. Now that we’ve had the oven a few years, it is a big part of our home cooking.


Making pizza starts at least a day in advance. The dough has to have the right amount of time to rest (and not too much time either). I start a few days in advance by making sure that my sourdough starter is perked up. Pizza dough is 65% hydrated, meaning water makes up about 65% of the weight of the flour. This varies a few percent based on current temperature and humidity conditions. An 11” pizza needs about 270-300g of dough. So, 10 pizzas takes about 3000 grams of dough. That is roughly 1820g of flour and 1180g of water. To make the calculations easier, I hydrate the sour dough starter at 65% as well (200g flour and 130g water) I use Tipo 00 pizzeria flour from Italy. There are several brands available locally, and I have found they are all pretty good.
The day before making pizza, I calculate the volume I need for making pizza. We will stick with 10 300g crusts, for example. About 8% of the total will be from the starter, so in this example, I need 240g of starter (composed of about 145g flour and 95g water). Total flour in the bulk dough is 1820g, so subtract the 145g = 1675g. Total water in the bulk dough is 1180g, so subtract the 95g from the starter we will use =1085g. Now mix the 1675g of Tipo 00 pizza flour and the 1085g water. I do this with a wooden spoon or spatula; it does not need to be completely mixed, but as close as you can get it. It will be stiff. Allow this to rest for up to 2 hours. This is the “autolyze” rest. This allows the flour to fully hydrate and activates the enzymes in the flour. After the rest, add in the 240g starter and 2% (in this case 60g) non-iodized salt. I use sea salt.
Then right to the mixer equipped with dough hook. I have a 20 quart Hobart A200 mixer (circa 1950’s), and it makes short work of a large batch. If you have a counter top stand mixer, divide the dough into 2-3 batches to process separately. Otherwise, you will go through a lot of broken mixers (I’ve done it.) The dough will come together as a ball and will pull away from the sides of the bowl. This is the indication the gluten is developed.
Scoop the dough into a lightly oiled container. I prefer a small food lug with a lid. Cover the dough and allow to rise at room temperature for two hours.After two hours, wet hands with water and stretch and fold the dough a few times until it remains in a ball in the middle of the tub. Repeat this each 45 minutes, three times.
Put out some bench flour and scoop the dough out of the tub onto the floured surface. Divide the dough into 270-300g portions, about the size of a fist. Form each into a seamless ball. Place the balls onto a lightly oiled proofing tray or pan. Rest at room temperature for about an hour, until bubbles are visible on the surface of the dough. Transfer to the refrigerator or a cold room (in winter). Allow to rest there for 18-24 hours (it can go longer if needed or desired).


The next morning, after a few cups of black coffee, and I can work on prepping toppings. I always try to make a toppings plan. Otherwise, I forget something.
Next, I make the pizza sauce. I like the taste of fresh tomatoes. A quart jar of our homegrown, home canned tomatoes makes enough sauce for about 8 pizzas. It’s OK to make a little extra because it can go into a pasta sauce later in the week. The canned tomatoes are just cored, blanched in boiling water, and then shocked in ice water. Pop them out of their skins into sterile canning jars, add a little salt and a few fresh basil leaves, put the lids on, and can in a boiling water bath. This cooks the tomatoes a little bit, but the fresh taste is better than any tomatoes you’ve ever had from a tin can. I have a variety of jar sizes to allow sauce batches to be scaled.


Pizza sauce is made by emptying however many jars of tomatoes you need into a bowl. I don’t drain the tomatoes because the juice in the jar is all from the tomatoes, no added water. I add a few turns of fresh black pepper, a healthy dash of good olive oil, and a few minced basil leaves. Hit it with a stick blender just enough to break up the tomatoes, not to puree them and no big pieces left. No further cooking until it goes on the pie.
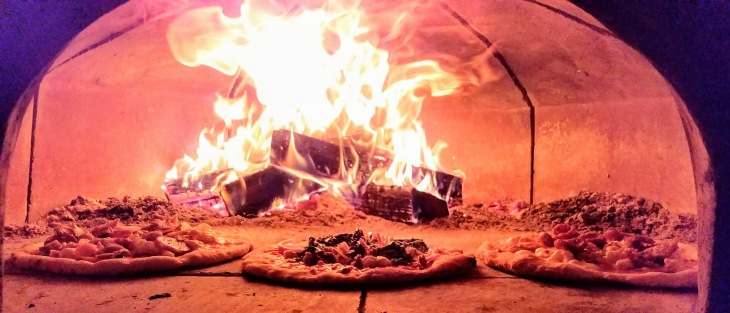
I take the dough out of the refrigerator and get the fire going about 2 ½ hours before cooking time. It takes about 2 hours to get up to temperature. It takes about three arm loads of logs about the size of my forearm to get the oven heated. Once heated, it takes little wood to keep it hot; you just want to have a bit of flame in there. I start by building a 3-sided “log cabin” just inside the oven, then fill it with kindling and lay a few more logs over the top. Light fuse, get away!

As soon as coals are established, push the fire back into the oven and add more logs. Then I just keep spreading out the fire and adding fuel for the next two hours. When the oven is getting close, the edges of the bricks inside the top of the oven will get white around the edges. Next, a larger white spot will form, and eventually the whole oven is white inside. With an IR thermometer with sufficient range, the inside of the dome is now about 1000F and the hearth is about 600F or so. Ready for pizza.


Put some bench flour out on the counter top. Put a few risen dough balls out on the flour. One at a time, stretch them to the desired diameter. They should be very thin in the middle and a small rim of bubbly dough around the circumference.
For tomato sauce (my favorite) use about 1/3 cup of sauce for a 11 inch pie. Evenly distribute bite size pieces of fresh Mozzarella over the sauce, and top with the toppings of your choice. My favorites are onion, mushrooms and sausage; or prosciutto with an addition of fresh arugula when it comes out of the oven; or roasted eggplant and red peppers with goat cheese….the possibilities go on and on!


Slide the pizza into the oven. Rotate to make sure the crust is evenly cooked all around. There should be charred spots and the bottom should have leopard spots. Remove the pizza from the oven and let it rest a few minutes before serving. The crust will be crisp on the surface, and light and fluffy inside.


Thanks for the information. I love Pizza. Yummy and delicious.
LikeLiked by 1 person
Thanks for reading and for the kind words! ~Tim
LikeLike
Would love to see a “Pizza Toppings” followup post!
LikeLiked by 1 person
Good idea. I will work on it.
LikeLike